RECENT POST
Wordpress for beginners steps by steps
Wordpress for beginners tutorials
Wordpress video tutorials for beginners
Password if have: bestblackhatforum.com

Top Best Themes

Wordpress plugins

Best wordpress plugin

Thursday 12 March 2015

8 tips to speed up for your WordPress Blog

When you operate a WordPress website, what do you most worried about? As security or accelerate it? In general, both the two issues are very important to us. Secure your blog to help long-term development and minimize the risk of attack to affect the path of development, accelerate blog to help minimize the potential loss of visitors and help search engines easily indexing your website more.

To help your website has good speed, the first thing you have to do is choose a good hosting provider and if the object of your readers in the country, choose the hosting server located in your country. But if for any reason, you use a foreign host and initial speed nor by the local hosting, but you have to install the plugin makes a lot of blogs has slowed even more sluggish. Therefore, now I will tell you some methods to improve speed through some blog plugin, advice and some services use. We started yet.


Testing Tools website

Here are some free tools to help you speed test website, and check the query to the server to be able to know their website weighs anywhere to optimize it.

WebPageTest
Pingdom
Web Page Analyzer
8 ways to accelerate your WordPress blog

Using the cache (cache)
Reduce the size of the image
Erase the unnecessary plugin
Using CDN Service
Select appropriate theme
Optimize database
Analyzing the page loading speed
Minimize ad on page

1. Using the cache (cache)

If you are using WordPress without installing the plugin cache for website creation, you lose 50% efficiency in speed and website. By saving the file as a static HTML website and will be accessed when visitors to the website instead of having to execute the query submitted to the server as usual.

WP Super Cache is a WordPress plugin to make the best cache up to this point, so I think you should set it to your website right away if you have not already.

2. Reduce the size of the image

WP Smush.it is the first choice if your blog using multiple images. This plugin will optimize image size down low but does not affect the image quality. Of course, this blog is only useful when you upload photos directly to the host. In addition you can also delete the image conducted unused by Image Cleanup plugin.

3. Remove plug and unnecessary things

Please proceed to delete the plugin and widget are not really needed or not in use to save space on your host file and remove the javascript, CSS plugin that comes if used.

When you delete the plugin, can the table in the database still intact and so will do more heavy database, at which point you can use the plugin Clean Options to detect and delete the table is not used to. The peace of mind you, but this plugin is quite long but appeared to present time (WordPress version 3.4.2), it still runs fine.

Warning: Be careful when using the plugin Clean Options because you can lose data if deleted by mistake.

4. Using CDN (Content Devilery Network)

If you have the condition, use the CDN service to accelerate blog. This is the best way to improve website speed based on the data is copied to the server near the visitor, more caching feature to create and optimize CSS and JavaScript files very well.

Most of these services are paid, but you can also use a free service CDN CloudFlare which is pretty good, but sadly this service is subject to a number of scandals, so please refer to the Google reviews before you use it.

And another important thing is that if you use multiple blogs Javascript you can use the plugin Use Google Libraries to automatically replace the javascript file that Google supports to reduce the burden for the blog page load and save tapes information. A plugin is similar but only work with CSS and Javascript files that jsDelivr CDN WordPress Plugin

5. Select the appropriate theme

If you use too many themes CSS or Javascript, the page loading speed will be reduced significantly. Please use the simple theme if your hosting with low speed, while limiting the embedded javascript file in the theme.

6. Optimize database

File too large database is one reason why your blog becomes slow or less. After each post, WordPress will automatically save a draft in the database, and if you have 100 blog posts which do not clean up the database once the blog as you have 200 posts. Plugin good job is WP-Optimize.


7. Analyze the page loading speed

After you have applied 6 on the way now is the time you should verify the page loading speed and see where analysis is not really optimal. If you are scratching your itch does it new coffee place, are not you. And that is why its recommended that you use one of the following plugins to track statistics and page load speed.

- GTmetrix for WordPress
- P3 - Plugin Performance Profile

8. Minimize ad on page

The promotional code will usually form slowly Javascript or Flash media as it will greatly affect the speed of loading pages on the website. So if possible, reduce the number of ads on each page, it's best to just 2 or maximum 3 ad to avoid affect the website.

Hope to 8 above methods will help you improve the speed of the blog. But if you want the best blogs have a stable and fast speeds, you should choose the reputable hosting provider and fit.

The best wordpress plugin speed most powerful

WordPress blogging platform which is a compact and has been optimized to be less human resource accounting as possible. But that's just the "perspective" if you are using WordPress blog without install any plugin or theme just yet, but if you install some plugins that you like and use these themes more details complex will make your blog become increasingly slow as it is old to go every day.

Shelve plans for moving hosting, you should apply some method other WordPress acceleration to improve the speed of the blog. One of the simplest schemes exclusively for the use WordPress plugin available for WordPress library to minimize the fine-tuning.


With tens of acceleration plugin support, the selection of a plugin in accordance with the needs of each person is a long-winded process. So for the benefit of the selected plugin for everyone, I would like a list of the best plugins for WordPress blog and follow speed I think you just need a few of 8 plugin is enough.

Create a page with WP Super Cache to Cache

If you want to improve the speed of the blog without using the cache (cache), it is somewhat flawed. The cache will shorten the page load time by backing up a static content server, and when people visit the store that they will be executed. Thus, we will send reuqest savings sewn to the server via the command implementation of PHP and database.

A plugin that is always in the list required in WordPress with WP Super Cache his own. With the advantages of ease of use, no need to configure many still support many functions essential, I believe this is the best option for those who do not understand much about technique.


W3 Total Cache

There's also a plugin with the same functionality, but somewhat difficult to use W3 Total Cache that. But if you need a plugin with more functions and more advanced configuration, this is a good choice.

Offloading Javascript to jsDelivr CDN WordPress Plugin


This is a new plugin to use WordPress known world over 1 month now. This plugin automatically converts the JavaScript file (.js) a public server outside the minimum to improve page load time, while saving bandwidth is not used directly for the JavaScript file on your host. If you have not heard of the term can be considered CDN CDN Concept - Content devilery network.

This plugin is also integrated with WP Super Cache and W3 Total Cache, my advice is whether you love her host any event, do not forget to use this plugin.

Load Intelligence with BJ Lazyload

One of the reasons the "classics" as your blog becomes slow that using too many images. After activating the plugin, the image in your blog will not load at once, but only load the image only when you need to see (go to the area display). If you still do not get this plugin to work out why the LazyLoad see demo here.

Use Google Libraries used to save bandwidth

Similarly with jsDevilery plugin, this plugin will help you to replace the common javascript file on the host to use the JavaScript library file on Google in order to save bandwidth and reduce CPU load to the server.

Optimize images to the hammy


If you have access to a website with many pictures of the browser on the mobile device, it will find it scary to long. The image to the size will cause sluggish loading on mobile browsers for processing capabilities of mobile devices is limited. So want to solve this problem, we have conducted to reduce the image size for each browser to be more appropriate for the device, and it is the feature of this plugin.

Security and acceleration with CloudFlare


This service has been mentioned in my introductory article CDN technology. About the true nature of it, this is a free service to enable CDN to speed up website to blog, and optimize your blog and security to avoid the risk of attacks and spam, a thing CloudFlare's even better now allows free use SSL to secure a better website.

Analysis blog with speed Plugin Performance Profile


Plugin Performance Profile

If you are not sure why your blog becomes slow, you can use this plugin for analysis. The detailed report will show you in the blog partly accounted for most resources, from which you can optimize for that part to reduce the burden on the server load.

Using Async Social Sharing button to insert social network optimization


You can insert the button to share articles on social networks not to blog? Do you realize what that from the share button? Nothing other than the blog you become a little bit slow to load because more JavaScript files attached it. So please use this plugin immediately, Async Social Sharing will download the javascript file after the entire contents on the blog has been loaded. Why this button to download the final? Because the content on your blog is more important, people just click Like or +1 only see your content really good, so why would it be to the javascript file of the download button at the same time with your content?

Optimized for Speed ​​Booster Pack PageSpeed ​​point

Install and activate without having to adjust anything Google PageSpeed ​​points higher, why not? Suitable for any of you interested in pursuing only Google Pagespeed score myself but it is not used.

CHMOD safe way to Your WordPress Blog

CHMOD is a website security steps and WordPress PHP generally very good in particular to limit the attacks directed at the source of the website as read sensitive information, create files in the directory.

In this article, I will give some advice CHMOD safe for your website on the host, you can apply for a CHMOD on Shared Host or private servers are.

As you know PHP files for the highest authority is 6 (write and read) should CHMOD standard way for all PHP files on the source website is 644 to WordPress website you can work normally.

Particularly some file wp-config.php sensitive, .htaccess should CHMOD 400 or 404, which is not granted write access to anyone except yourself edit the files directly.


But when CHMOD 404 or 400, each time you install plugins that need repair as .htaccess files, wp-config.php, you have to edit it manually. In turn, if you want to not be so, can CHMOD 600 or 604.

CHMOD safe folder

For directories, the highest authority in addition to 7 for read, write, it also has access. Therefore, CHMOD standards for the folder to your WordPress website works well is 755.

However you can CHMOD the folder wp-admin and wp-include the 705 or 700. But please note that you must update the new WordPress version manually because it can not overwrite the files to. So when using it on CHMOD 705, when the update, please CHMOD 755.

Also, if you want a safer, you can CHMOD wp-admin folder to 101, meaning that not only has read access to write anything.

Epilogue

In this article you will probably be the last to know how safe CHMOD WordPress website then right? And I encourage you to CHMOD as to minimize unnecessary risk from malicious code or some other form of attack.

6 Simple Tips to Secure for Your WordPress Blog

The diversity of forms of attack and exploit the content on WordPress too have a secure website from simple to complex. While the application of the method of WordPress security complex, make sure you've set up your WordPress website more secure because sometimes the setup is very simple clues to the hacker broke into the website.

If you are not sure of their website's security settings or not, check out the tips below, and even if you do not do.
==> 6 Simple Tips to Secure WordPress

1. Do not use the account name "admin"


After many tests and supported many people, I noticed that a lot of people named administrator account with the website name is "admin", "administrator". This indeed is a disastrous mistake.

The use of usernames popular style this insecure world is by now have some form of attack is the Brute Force Attack; means to continuously log on to your website with a list of accounts and passwords available that a hacker has somehow been.

Therefore, the common account as "admin" can easily be found via password Brute Force Attack this form. Once installed, the website should set yourself a real difference username and unpredictable as a "thachdeptrainhatvietnam" for example.

If you have missed taking a username named "admin", do not worry, you can use the plugin WPVN - Username Changer to change directly from the user.

2. Use complex passwords


Like the use of username is "admin", the use of a password is too simple may be susceptible to other forms of attack detection Brute Force Password Attack detected after a certain time.

Ideally, place the password include uppercase letters, numbers and special characters are the best. You do not need to worry too much about not being able to remember this password, you can use software such as LastPass, StickyPassword to save passwords and automatically log on to the next.

Tips: Use Strong Password Generator to generate strong passwords.

3. Update the plugin, theme, WordPress to the latest version


One piece of advice that is also very important to regularly update the version of the plugin, WordPress and the theme you are using on the website to the latest version. So probably older versions exist some pink hole "fatal" to the timely update you will avoid the risk of it.

The updated plugin, WordPress version is extremely simple, that's when it will have the new version announced and displayed on the website, in which selected it automatically updated to the new version before.

4. Use the host quality


If you are using the normal host services (Shared Host) it is important to use the host at suppliers to ensure the most.

Because Shared Host packages are located on the same server, but just one website in the collective website on servers infected with malicious code, the website will also have the risk of intrusion in the form of Local Attack .

Therefore, you should choose the services that host the prestigious sending instead of using the vendor at the user, has not been verified.

References: 7 Shared Services Host Best WordPress.

5. Stay away from the null - piracy

Products null they are saying here is that products such as premium paid plugins, premium themes are shared widely publicized in some specialized website to share these items.

You must know that the use of premium products that are not only share such serious violations of the rights issue, you are directly put her closer to malware.

A study has shown that the majority of the null rampant on the Internet today are malicious, and it may be illegal exploitation of natural resources your host, insert hidden or worse backlink is knocked out.

6. Avoid CHMOD 777

If you only heard CHMOD not quite understand it, but then drill to learn because it is quite lengthy, but I just need to know that you avoid the CHMOD the folder to 777. With 777 decentralized setting, ie you're set that folder with a maximum aperture makes every user on the server has the right to write / delete / executable directory and the files inside, this is the reason for why you are suddenly made website malware is unknown background.

If you use the Shared Host, you should know that the best way to be ready CHMOD 755 for folders, 644 files. For the file wp-config.php sensitive, please CHMOD 444 or 440 or 400.

Epilogue

Above is synthesized 6 tips are important in your time administrator WordPress website to remember to avoid the unfortunate happen, but fortunately are 6 tips on easy implementation.

How to setting Wordfence Security for Your WordPress Blog?

Wordfence is a free plugin for WordPress best, and now it is a free plugin that specializes in security the most widely used.

The reason why it is used so much because with extremely good features that can limit many popular forms of attacks, such as Local Hack, XSS, SQL Injection and password functionality including dual layer auto scan malicious code on the host.

In this article, I will briefly introduce the function and using your Wordfence Security to secure your WordPress website better.


You can use this plugin with iThemes Wordfence Security Security for more specialized firewall.

The whole function of Wordfence Security


Before use, please list your entire functions in Wordfence Security so you know it can be done, although we may not need to use all the functions.

Additional Falcon Engine technology to create a website caching to speed up to 50 times. If you use this function, remove the plugin WP Super Cache cache as, W3 Total Cache.
Compatible with other plugins and themes, such as Woocommerce.
Automatically lock the common attacks. For example, a website that uses Wordfence which was attacked and set them to block the attack, then your website will also block attacks.
Add two layers of password validation code over the phone, like Google account so.
Vulnerability scanning through security error "HeartBleed".
Mandatory other users on the website to use complex passwords.
Automatically scans WordPress source code, plugins and themes to detect malicious code. For the source, it will compare with the source code of WordPress to see if there is a change, it will inform you.
Set up a firewall to block common attacks and spammer users, such as posing as Googlebot.
Automatically lock the attacker was black listed by checking the Advanced IP, check out WHO IS domain.
Subscribe to the change of the file on the host and you can customize the auto repair if the file has changed.
Automatically scan and find some common malicious code such as 99, R57, RootShell, Crystal Shell, Matamu, Cybershell, W4cking, Sniper, Predator, Jackal, Phantasma, GFS, Dive, Dx ... and a lot of other names.
Automatically scan pages on the website to see if paralyzed insert malicious code or not, and check whether the page has been listed on Google blacklisted or not.
Automatically finds and blocks suspicious malware.
Customize limit the bot can gather information website, to avoid being large botnet attack frequency.
Subscribe to real-time counter on your website, website statistics 404, changed and edited to remove content, ...
Subscribe to real-time statistics and visits based on the country.
Check the hard drive of the host information for a variety of DDoS attack will make your hard drive is full.
And some other minor functions.
Set Wordfence Security

I just guided through the main function, you can take the initiative to learn more other functions.
After installing the plugin Wordfence Security, they have taken the initiative to establish the important functions you need for your website to be safe.

You can go Wordfence -> Options and select the Security Level to set it manually, depending on the level, it is best if your website is normal, no one attacked, only select Level 2 only.


Block dangerous country

If your website is Vietnamese should actively blocking some hits from the countries where you do not need them in order to minimize their chance to attack.

To block countries you to Wordfence -> Country Blocking and select some countries you need to stop and then press Save Change.


Some countries should stop:

China
Russia
Israel
Turkey
Iraq
Iran
Germany

As for the remaining features you can actively explore coz it is not too difficult to understand where very own, Falcon Engine Cache function through because I did not say that it's unlikely to work on your website or not ( but I test it all worked well) so you can go to the Wordfence -> Performence to enable this functionality.

I wish you success!

How to config and use iThemes Security on your Wordpress Blog?

How to config and use iThemes Security?

Download the plugin


Find and install the plugin iThemes Security

Immediately after the installation is complete, Secure Your Site Now button to start the setup.

Then you just need to click on the two options as in the picture and the Dismiss button to finish.

Sau that you move through the Settings tab and begin exploring its options.


There are sections Go to the navigation bar, when you select each part of the window that will lead you to the area corresponding to set. Let's look at the options at the bottom of the Security iThemes offline.

The basic options iThemes Security

Global Settings

This section contains the basic settings for iThemes Security.

Write to File - This option allows other plugins automatically add content to wp-config.php and .htaccess file, you can select it to install other features of iThemes Security or plugin created cache automatically.

Email Notification --mail address to receive notifications related to iThemes Security plugin, you can add multiple email separated by a line.

Delivery Email Backup - backup file to receive e-mail address if you backup data by iThemes Securtity.

Host Lockout Message - Message error message to the log failed due to blocked IP.
User Lockout Message - Message error message if a member is locked.
Blacklist Repeat Offender - Activate using spam address list public. You should choose because it will help you get rid of the spammers on this list.
Blacklist Threshold - The number of blocked IP will be converted to a permanent lock.
Blacklist Lookback Period - Duration block spammers listed in the Blacklist Repeat Offender.
Lockout Period - The time for each lock if someone tries to log in, but failed.
Lockout White List - List of IP is not locked.
Lockout Email Notifications - Receive email notification when someone locked.
Log Type - Recording the activity log of the plugin, choose the Database Only.
Days to Keep Logs Database - The duration of the log records in the database, following the expiration of the log will be deleted.
Path to Log Files - The path of the log file.
Allow Data Tracking - Allows iThemes collect your data used to analyze them.
404 Detection

This is the option to send the message for each member to access a page fault detection and 404. You should consider this option is enabled if your page has too much because it will appeal 404 matches email box you and a lot of resources.

Minutes to Remember 404 Error (Check Period) - The time that the system itself does not remember 404 and reported at a later time.
Error Threshold - The maximum error which each member can see, if the maximum number of members on page 404 in this section will be locked. Usually happens with spam bot.
404 File / Folder White List - The file / folder it will be ignored and no error checking 404.
Away Mode

This is a feature that helps you lock the administration page in the given time, you can only get in a certain period of time. Very useful for website 1 admin and you have the option of locking the admin page when you are sleeping, working example.

Enable away mode - Turn Away Mode.
Type of Restriction - type refuse, if you visit the site each day, select Daily.
Start Time - Time to start "open ports" admin page.
End Time - Time to close the portal admin page.
Banned User

Options allow enable a member of any committee, including spam bot.

Enable HackRepair.com's blacklist feature - Turn Key spam bots list of HackRepair.com.
Enable ban users - Turn locking member (not a member of your WordPress site).
Board Hosts - List of IP will be banned, each IP is a line.
Ban User Agents - Type of User Agents will be banned, applied to the spam bot. You can to Google type in "Bad User Agents list" to get a list and put this option if you wish.
Whitelist Users - IP will not be banned.
Brute Force Protection

This option will help you against Brute Force Attack in the form of restricted logins wrong.

Enable brute force protection - Turn against Brute Force.
Max Login Attempts Per Host - Number of failed log a maximum of IP.
Max Per User Login Attempts - The number of failed log maximum of one member.
Minutes to Remember Bad Login (check period) - The time to remember the login error, if in this time period that exceeds the number of incorrect login attempts allowed, it will be blocked.
See also: What is Brute Force Attack and Prevention.

Database Backup

Optional support automatic database backup. Only turn on if you have a small database for use BackWPUp or BackupBuddy will be much better.

Full Database Backup - Backup the entire database.
Backup Method - The method backup, it will be sent via email or backup copies stored on the host or 2.
Backup Location - Links folder containing the backup file.
Backups to Retain - The backup file will be retained on the host. For example, if you put it if it is 5 more than 5, it will automatically delete the oldest backup file.
Compress Backup Files - Support compressed backup file.
Exclude Tables - The table in the database you do not want to backup.
Schedule Database Backups - Enable automatic backup.
Interval Backup - Automatically backup after a certain number of days.
File Change Detection

Features notice if there is something in the host file is altered, usually to detect the insertion shell files. But just in time to turn to because it requires resources.

Enable File Change detection - Enable detect file changes.
Scanning File Split - Split the section of code to check the turn instead of once, saves resources.
Include / Exclude Files and Folders - Option to remove or include files to detect.
Files and Folders List - a list of files / folders that you want to exclude / include to scan.
Ignore File Types - The file formats that it will be ignored.
Email File Change Notifications - Enable notification via email.
Hide Login Area

Enable change log path instead of / wp-admin same.

Login Slug - Slug path logged in, if you write the address is dangnhap your sign looks example.com/dangnhap.
Register Slug - Slug path register.
Enable Theme Compatibility - Optional automatic compatible theme.
Theme Compatibility Slug - Path 404 error.
Secure Socket Layer

This feature is applicable to our SSL if your website has SSL certificate. If you do not have SSL, most if not fault the original website.

Front End SSL Mode - Enable SSL for the website.
SSL for Login - Enable SSL for login system on the website.
SSL for Dashboard - Enable SSL for Dashboard.
Strong Password

Apply mandatory use complex passwords for security.

Enable strong password enforcement - Enable strong password required.
System Tweaks

These settings will intervene in this system are used to hosting your privacy. Since this is the advanced settings, so do not choose if you do not know what you're doing.

Protect System Files - Secure your important files of WordPress wp-config.php like, .htaccess files, wp-include, Instal ....
Disable Directory Browsing - Do not allow file browse file browser, which means that if you do not have the file directory index, it still does not show a list of files in it.
Request Methods Filter - Filter queries sent through the URL, it will block the query dangerous nature or suspicious.
Suspicious Filter Query Strings in the URL - Filtering and blocking queries dangerous nature on the URL, such as they are trying to access the files in the folder themes, plugins.
Filter Non-English Characters - One way to limit SQL Injection by blocking the query contains strange characters. Should choose.
Long Strings URL Filter - Filter the query is too long, usually in the form of SQL Injection attacker often write queries over a long URL to change the database. Should choose.
Remove File Permissions Writing - Auto CHMOD security for sensitive files, if enabled, the file will be CHMOD to 0444 instead of 0644 as the default.
Disable PHP in Uploads - Do not allow execution of PHP code in upload feature in WordPress to avoid shell membrane up to the host. Should choose.
WordPress Tweaks

These options will intervene in the WordPress source code for security.

Meta Tag Generator WordPress Remove - Delete the default WordPress meta tags themselves born to make hacking difficult to determine the version of WordPress you are using to find the bug.
Remove the Windows Live Writer header - Remove header tags to respond to queries from Windows Live Writer to avoid the form of attacks by taking advantage of this to post files illegally.
Remove the RSD (Really Simple Discovery) header - Remove header card contains xml-rpc header file to avoid the forms of attack by unauthorized taking advantage of the post.
Reduce Comment Spam - Anti-Spam in the comment.
Display Random Version - Automatically displays some random hacker version of WordPress difficult to determine the true version you are using.
Disable File Editor - Not allowed to edit themes, plug-in Dashboard.
Disable login error messages - Off to display the error log hacker is difficult to determine their error or error log.
Force users to choose a unique nickname - Do not use nicknames for members overlap.
Disables a user's author page post count is 0 if spend the weekend - Do not create separate paths author if they have not all.
After the change is done, just press the button Save all Changes.

Advanced

This is the advanced settings, restrict tampering if you fear failure or the best backup the entire database and code before using the tools in here.

Admin User

These changes will affect the website admin account.

Enable Change Admin User - Rename the username of admin.
New Admin Username - The name of the admin login.
Change User ID 1 - Change User ID of admin to avoid detection.
Change Content Directory

Options for how to change the wp-content directory, very dangerous if you used a long website. Should only apply to the new website.

Change Database Prefix

Change of database prefix instead wp_ default, this option will be less likely to error, so you can rest assured that use.

 Epilogue

These are important features that you need to talk through the Security iThemes this plugin. Although the version developed by iThemes launched not long, but according to his assessment, it still works pretty well at the moment and will continue to edit and add quite a lot. Hope for iThemes Security plugin, you will have peace of mind in securing WordPress.

How to install plugin JetPack on Your Wordpress Blog?

In the list of installed plugins needed to, JetPack to say is always the first choice because of the strong and diversified its features. This is one of the most multi-user plugin by Automattic key made. These features are also very much in the JetPack taken from services WordPress.Com so here is the solution for you do want to add that feature to self-host your WordPress website.


JetPack need to connect to wordpress.com, you need to have an account at wordpress.com. And you will not be able to use JetPack on localhost.

The function of JetPack

JetPack plugin is a set of features to improve your blog, but by no means does the function will enable you want to use the pop-up does not it go off so it was not too heavy.

The function of JetPack include:

Manage multiple WordPress sites at once from WordPress.Com service.
Statistics hits per day.
Edit Custom CSS with CSS.
Sign in to your account using wordpress.com website.
Manage authentication with Google Webmaster Tool.
Features related articles.
Write content Markdown language.
Using CDN WordPress.com images via Photon to save bandwidth and speed.
InfiniteScroll - download next article by sliding down the bottom of the website.
Customizable widget display through each different page.
Additional JSON API into the website.
Features Like the article, not the Facebook Like.
Automatically share articles on social networks to Publicize.
Receive notifications related to the operation of the website.
Replace the chassis frame Comment comments JetPack, enable logging by social networking account to comment.
Allow customers to receive new posts via email Subscriptions.
Demonstration of beautiful images with Carousel.
IMPROVED post via email.
Insert the button to share articles on social networks.
Check spelling article.
View more detailed information about Gravatar when mouse over their avatar.
Create a contact form.
Tiled Gallery - create a gallery displaying beautiful images.
Share article linked by short (shortlink) from wp.me.
Particular interface when accessing the website by phone.
Type a mathematical formula.
Additional widgets.
You can see more about the features of JetPack here.

Set JetPack plugin

Installation is as simple JetPack plugin, go to Dashboard -> Plugins -> Add New and search by WordPress.com JetPack plugin name. Then click install and activate.


After activation is complete, press the Connect button in the notification bar to WordPress.com to conduct connect your website with your wordpress.com account.


Login and connect successfully, press Activate Now button to activate.


Make sure that your website must be placed on the host, and not blocked access from the outside. If you can not connect, try contacting your hosting provider or install the plugin Slim JetPack but the feature is not sufficient for much.

Activating the features of JetPack

As I said in the first post, but JetPack is a collection of dozens of functions, but basically you just turn the lever to avoid heavier website. JetPack default settings on it will shut down a number of functions you want to turn up.

To enable the function to be used, you access the Dashboard -> JetPack -> Settings and select the function has not been bold blue background and press Activate.


Done that, now you can start to use the functions you need. Each feature is activated when to have words Configure to set up the press on the page that will each feature set.

The plugin needed to install for your wordpress blog

You already know how to install the plugin and use the plugin and then, and this is the superior characteristics of WordPress.Org than WordPress.Com. But avoid installing plugins you do not know or do not know how many plugins, I have a list of instructions for each plugin that they deem essential and you should install your website though nothing in the fields.


List of plugin to be installed

The following plugins are detailed instructions in Thachpham.com, please click on the plugin to see the detailed instructions.

JetPack - The collection of useful tools for WordPress (not installed on localhost).
Akismet - Anti-spam comment powerful.
TinyMCE Advanced - Additional buttons on the WordPress editor.
SEO by Yoast - Support for WordPress SEO best.
WP Super Cache - Create caching to speed up the website.
iThemes Security - Security Plugin for WordPress the most popular.
Contact Form 7 - Creating the best contact form.
Responsive Lightbox by dFactory - Create lightbox effect when clicking on image to view larger image.
ReplyMe - Send notification when someone replies to a comment.
Disqus - If you want to use as Thachpham.com comment system is installed.
It is the plugin that I think you should install on any website though as yet, of course, in addition to the above plugin you can install plugins that you deem appropriate.

How to find and install wordpress plugins?

Unlike theme, plugin you may not need to pay for library plugin free plugin available was very good and so here I will focus on finding and installing plugins available through the library.

How to find and install the plugin is very similar to installing a theme, which is that you can install over 3 way directly from the libraries installed on the dashboard, upload the plugin .zip file or upload plugin in the directory / wp-content / plugins on localhost / host.

To find the plugin, you access the Dashboard -> Plugins -> Add New


Once in there, you can also search through plugin names by entering the name in the right hand pane Search Plugins and Enter, or view the list of plugin through the filter as Featured (highlight), Popular (common) , Recommended (recommended). If you are a beginner, you should skip Popular section and install the plugin in it.

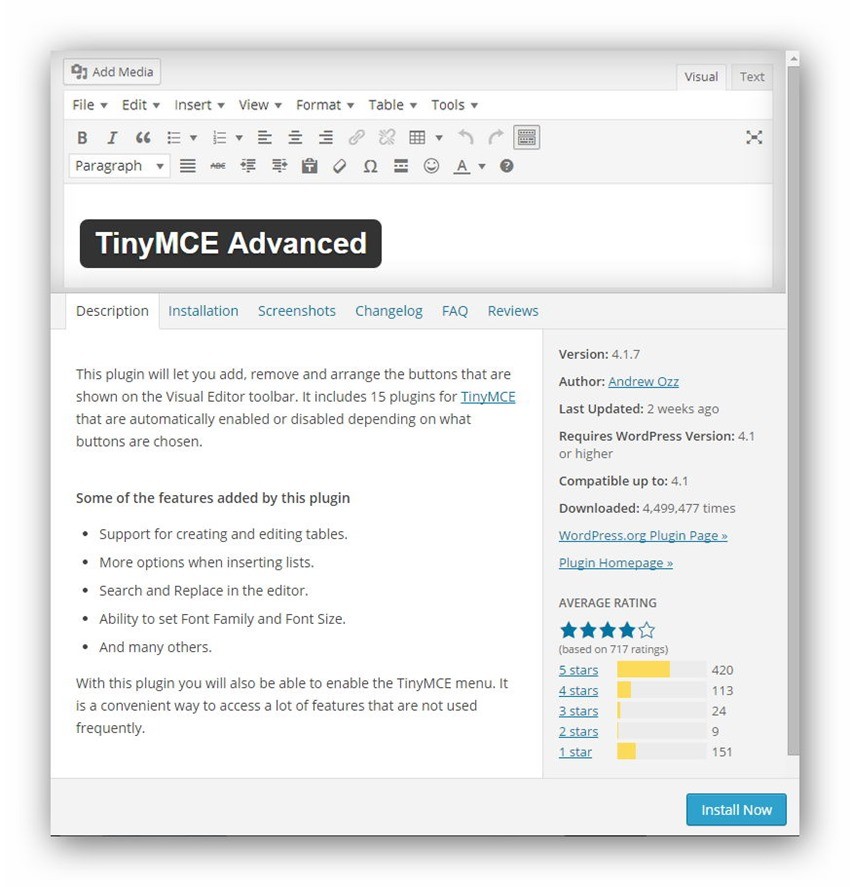
You do not just click on the Install Now button, click the plugin name to view detailed information as described (to know what plugin function), Screenshot (photo) and Installation (installation).


A plugin information, please read before installing


For better or plugin that you look at the numbers Downloaded (downloads) and Average Rating (evaluation of the user), if it has high scores, download the install because many were many who believed not a great use for other plugin is installed and working. But with the popular plugin, there is almost no error, if an error occurs, it is only in your host does not respond duoc1).

After making sure the plugin you want to install, press the Install Now button to start the installation and click the Activate button to activate.

Or if you have a plugin that under your computer, on the Dashboard -> Plugins -> Add New -> Upload plugin .zip file and upload the plugin to. Please note that this plugin must be compressed in accordance with the structure /ten-plugin/ten-file.php not /ten-thu-muc/ten-plugin/ten-file.php.

To find a richer plugin, you should visit the address and search plugin https://wordpress.org/plugins/ by name, tag, ... and Falcon which is to copy the name Dashboard plugin to then find that out as soon as the library plugin which is taken from here that.

Ok, I temporarily ended instruction plugin here because of what I said in the post was enough. In the next part of the plugin tutorial, I will teach you how to use a typical plugin so that you will have platforms that use the plugin more complex, because the plugin is installed we have set the parameters for it to work properly it will. There are many complicated plugin must say very violent so using a plugin sometimes have to learn that home.

Setup and manage comments (comment) on Your Wordpress Blog

The original WordPress blog is an open source code which should also include a feature commentary and strong management commentary to all readers can post comments to best interact with the author, which is an advantage the blog that is not the type of website has been.

In this article I will explore with you through the features and guidelines set features the best for yourself and convenience of the reader post a comment. By default WordPress comments feature will require you to enter your name, email and website link (optional) to be able to post comments and submit comments bracket will look like this.

Features submit comments in Wordpress

Default in WordPress, it will proceed to raise all the comments from readers on standby browser and also will have a notification sent through email alerts as new comments recently. To view and test the commentary is in standby mode browser, you will see the Comments section as follows:


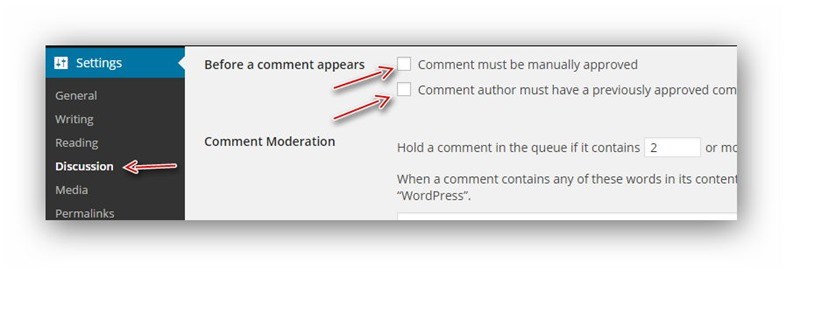
If you want to browse public comment, simply push a button to approve comments that are. Where not want to display it, or delete it, you can click on the Trash or Spam. If you want their comment will be displayed immediately without having to wait, you can browse to Settings -> uncheck Discussions and two lines in vẻ Before a comment.


Prohibition of the sensitivity to comment

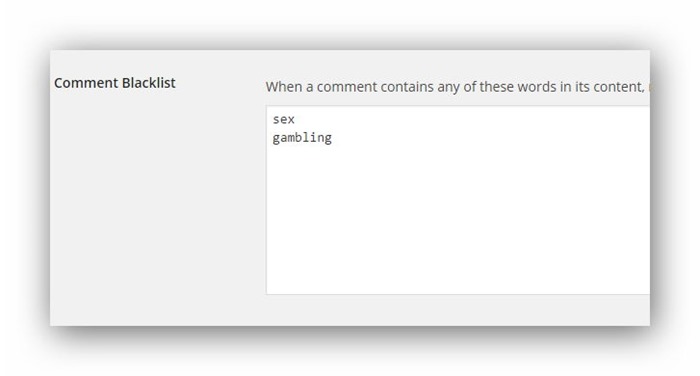
Assuming you do not want to blog with some commentators mention some phrases sensitive, you can still use banned readers using the Comment Blacklist feature in the Settings -> Discussions. Please enter the word or phrase should be banned and each of you separated by a line as below.


Avatar appears in comment

Default WordPress supports only display avatars in http://gravatar.com service, which means if you do not already have an account at Gravatar then it will randomly display the default avatar.

If you want to own avatar then go to the home page and register Gravatar account, or sign in with your WordPress.com account, then add the email to attach and upload an avatar to avatar from your computer to be completed. Then, make sure that your email in Users -> Your Profile using email identical to the registered email avatar.

Anti-spam comment

State of comment spam in WordPress really is a disaster for the popular WordPress should have a lot of spam software supports the use WordPress website easily. Sometimes you just installed web only, no time to promote the spammer has "visited". To prevent comment spam most effective, install Akismet plugin follow this tutorial is finished.

Epilogue

Above are some notes on how to use the WordPress comment system and how to customize it really optimal. Please remember that the comment is a support interactive features strongly in the blog should regularly check and reply comments to the readers offline. ;)

The difference between the Post and Page in Wordpress

You already know how to create and how to create a Page Post, but can many questions you will have different Post and Page how, when using Post that when using Page. To answer this question for you, I'll answer for you about the difference between the Post and Page because these are actually two completely different concepts and uses completely different as well.

Common Post and Page

Post and Page have one thing in common is that both in the form of Post Type in WordPress, meaning the content so that we can enter into the material through the draft and published on the website. By default, WordPress has two post type the Post and Page and if later you learn through Advanced WordPress will learn how to create a post according to their type 1).

In addition, features such as comments, Featured Image, Slug, Custom Fields, ... v ... v..deu on the Post and Page.


Post and Page Different how?

There are many different views, namely:

Post category and tag support for sorting, Page did not.
Page supports hierarchical parent page - the page, Post does not.
Page Page Template support, Post does not.
When you sign up, Post will display automatically on websites, Post does not.
Post has displayed in RSS Feed, Page did not.
Purpose of use

When using Post

Post to your bulletin post / article that you want it to be classified by a certain category and automatically show out website; such as diaries, news, articles, ... etc ..

When using Page

Page Do not be classified by category or tags, and do not show themselves to be the best website we will use it as an introduction to information and non-updated frequently, such as Page Contact Us, About Us, ... v ... v ...

Epilogue

Hopefully with a few brief explanation, you will be able to understand the nature of Post and Page how to avoid misuse purpose because if you later need to change it would be very time consuming so the best you should define use cases fit Post and Page now.

Blog Archive

Visitor

 
Copyright © 2013 Wordpress Tips And Trick